
CM14 Pre-stretch control card (Genesis HS)
The film broken we shown the video problem and trainer complaint The ring is low speed therefore become broken the film. Then we prior CM14 card and check the analog sensor. The CM14 card as shown as picture below. When machine running and problem we can see by "the Red led" will bright. When machine running properly we can see by the "Green led" will bright.
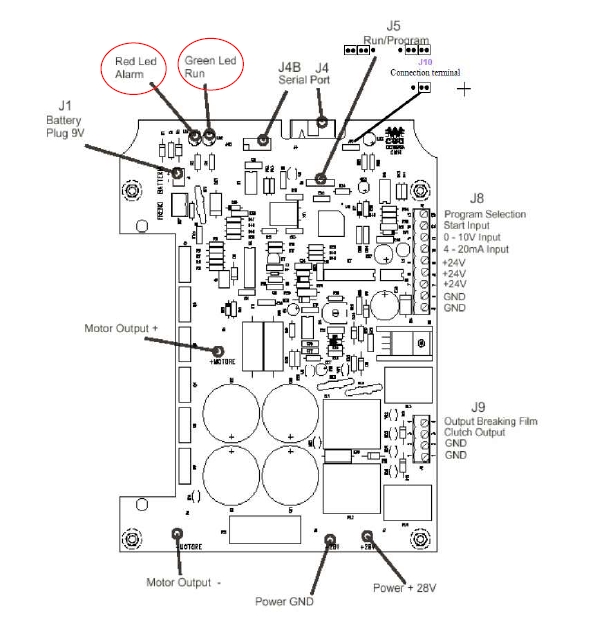
If machine running properly but the film still broken. We can adjust the parameter of CM14 card no 24. This parameter is control the minimum of value of the film broken.

If there are batteries on the ring, turn the disconnect switch on the pre‐stretch to ON. If the batteries are not present, connect an external 24‐28Vdc and minimum 20A power supply directly to the CM14 board
1. Connect the RCL240‐2 or RCL240‐4 control terminal. If the RCL240‐4 version is used, press and hold down key C while connecting the cable; Throughout the procedure, this value must never drop below 24 V to avoid false readings;
2. Check the power supply voltage at the drive input using the "16‐Input Volts " parameter. Throughout the procedure, this value must never drop below 24 V to avoid false readings;
3. Set 1 in the parameter “0 – Prog selection”;
4. Press the dancer roller forward with your hand up to half of its stroke;

5. Read the value on parameter "20 ‐ Analog input" and set it in parameter "33‐ Max Input"
6. Press the dancer completely forward and let the dancer return to its rear position with the aid of the force of the spring alone.
7. Read the value on parameter "20 ‐ Analog input" (1st test). NB. Press OK to refresh the value.
8. Move the dancer forward again and then let it return to its back position, again with the help of the force of the spring alone;
9. Read the value again on parameter "20 ‐ Analog input " (2nd test); NB. Press OK to refresh the value.
10. Compare that the values read in the two tests do not differ from each other by +/‐ 2.
If the compared values are within the tolerance range, continue the procedure by going to the next step.
If the compared values are outside the tolerance range, repeat the procedure from the beginning, first checking:
‐ the mechanical system of the dancer
‐ the correct fixing of the sensor
‐ correct fixing of the sensor cam
‐ the correct adjustment of the force of the shock absorber placed to attenuate the back stop of the dancer
‐ the adjustment of the cylinder exhausts
‐ the wiring and functionality of the analog sensor
11. Add 5 to the value read after the last test, insert it both on the "24 ‐ Ref FilmOff" parameter and on the "32 ‐ Min Input" parameter;
12. Set 2 in parameter “0 – Prog selection” and set on parameters “24 ‐ Ref FilmOff”, “32– Min Input” and “33‐ Max Input” with the same value set in setup 1;
13. Set 0 in the parameter “0 ‐ Prog selection”;